
Resource Markups define additional costs that are applied directly to Resources. They are commonly used to account for:
- Labor burden
- Payroll taxes
- Insurance
- Small tools
- Fuel adjustments
- Fringe benefits
- Allowances
- Profit
- Overhead
Resource Markups help ensure the actual cost of performing work is reflected in estimate calculations.
Table of Contents
Resource Markups vs. Rate Table Markups
Although both affect pricing, they serve different purposes.
Resource Markups:
- Apply directly to individual Resources.
- Define how costs are calculated.
- Can use Percent or Dollar values.
- Support Resource-specific pricing.
Example
A Foreman Resource may include a certification premium of $2.50/hr. That markup applies only to that Resource.
Rate Table Markups:
- Apply to entire categories.
- Affect groups of Resources.
- Support market and company-wide pricing strategies.
Example
A Labor Burden markup of 18% may apply to all Labor Resources in a Rate Table.
Types of Resource Markups
DESTINI Cloud supports two markup types.
Percent Markups
Percent Markups increase a Resource's cost by a percentage.
Example
- Burden
- Insurance
- Overhead
- Profit
- Escalation
Dollar Markups
Dollar Markups add a fixed amount to a Resource's cost.
Example
- Premium pay
- Certifications
- Tool allowances
- Specialty equipment allowances
Create a Resource Markup
- Open an estimate in DESTINI Cloud Estimator.
- Click the gear icon in the top right corner of Estimator to open Settings.
- Under Self Perform, select Resource Markups.
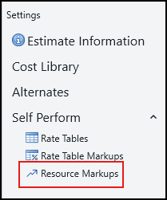
- For one of the following resource categories, click the green Plus (+) icon:

- Labor
- Equipment
- Other
- Select an option:
- Add Percent Markup
- Add Dollar Markup
- Enter a Name.
- In the Based On column, if you chose a Percent Markup in the previous step, then choose one or more options from the drop-down list. If you select multiple Based On options, the markup can't be selected by another markup.

- Press Enter on your keyboard to save the markup. The markup becomes available for Resource calculations.
- Click Self Perform.
- Select the Resource category tab for your new markup (for example, Labor).
- Notice the new Resource Markup column for your Resource category.
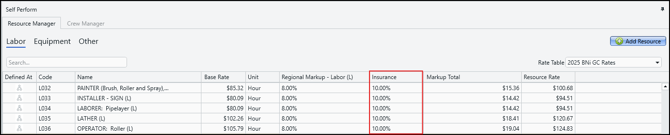
- Enter the markup for your resources in the new column.
You can edit Resource Markups as prices change. Common reasons for updating markups include:
- Insurance increases
- Labor burden changes
- New fringe benefit rates
- Project-specific pricing requirements
Changes immediately affect Resource calculations that use the updated markup.
Delete a Resource Markup
To delete a Resource Markup:
- Open an estimate in DESTINI Cloud Estimator.
- Click the gear icon in the top right corner of Estimator to open Settings.
- Under Self Perform, select Resource Markups.
- Hover your cursor over the column to the right of the markup.
- Click the red Minus (-) icon.
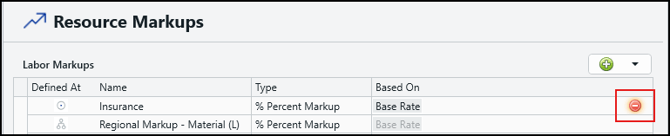
Note the following information:
- If you're unable to delete a Resource Markup (it doesn't display a red Minus (-) icon), it means the markup was created in Cost Library. You can verify it was created in Cost Library by the multi-tier icon in the Defined At column. Markups created in Cost Library can only be deleted in Cost Library.
- Review estimate impacts before deleting a markup that may be referenced by multiple Resources.
Best Practices
Consider the following recommendations when managing Resources and Resource Markups:
- Use Percent Markups for burden, insurance, and overhead.
- Use Dollar Markups for allowances and fixed-cost premiums.
- Review markup values regularly to ensure pricing accuracy.
- Avoid creating duplicate Resources when a markup can achieve the desired pricing variation.
- Test markup changes before using them in production estimates.
Related Topics
- How to Manage Resources in DESTINI Cloud Estimator
- An Overview of Self Perform in DESTINI Cloud Estimator
- Working with Rate Tables in DESTINI Cloud Self Perform
- How to Create and Manage Rate Table Markups in DESTINI Cloud Self Perform