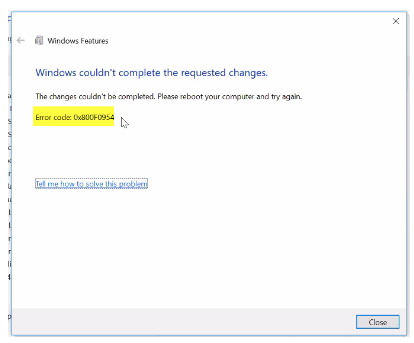
We have seen users having issues with enabling .NET 3.5 after Windows updates. They receive the following error code below:
Note: Some IT department uses their own Internal Windows Update service, so the easiest way to get this to update through the Windows Features in the Control Panel is to have the IT Department add the .NET 3.5 to that Internal Update Service, and then that will be available for the I.T. Admins to enable .NET 3.5 through the Control Panel instead of the steps below. Those steps can be found here - Install .NET 3.5 Window feature
You can also read more about the problem on the Microsoft Website here.
Here are the manual steps to enable .NET3.5
- Download the Windows 10 ISO file from MS’s official website. Once downloaded, right-click on the iso file and go to Open with > Windows Explorer. This will mount the ISO file on This PC. You can also use the DVD if you have one for this purpose.
- Press Windows + X to open the Start menu context menu. Now, press A to open the Command Prompt (Admin).

- In this Administrator Command Prompt, copy and paste the following command and press Enter. It will look something like the image above.
Dism /online /enable-feature /featurename:NetFX3 /All /Source:XX:\sources\sxs /LimitAccess
Note: Make sure to replace the XX with the drive letter name that the ISO file mounts with.
- After the completion of the installation, the command prompt should show Enabling feature 100% completed like the image below.
After the installation is complete, restart your computer to ensure that the changes take effect. Once your system is back up, you should be able to install any older applications that require .NET Framework 3.5 without encountering any further prompts.