Customizing the WBS Selection List in the New Cost History Dashboard
This article will guide you through the process of customizing the WBS Selection filter found on the Estimate Distribution and Estimate Comparison tabs in the latest Cost History dashboard.
Prerequisites
The Power BI dashboard shown in this article was released in early 2025. Hosted clients can request the latest Cost History Dashboard by submitting a ticket to Support.
- Power BI Desktop version installed on your PC
- Hosted clients will need to be whitelisted for direct access to their database (contact support if you need to be whitelisted).
The WBS Selection list allows you to filter data by one WBS property. This list comes with some common WBS properties as standard, but it's important for users to customize this list to map the WBS properties specific to their database.
The following steps will guide you through this simple process. Watch the video, or follow along with the written instructions.
Video Instructions
1. Reveal the DAX Script
- Open the Cost History dashboard in Power BI Desktop.
- Go to the Estimate Distribution tab, where you will find the WBS Selection list. By default, there are eight WBS filters in the list.

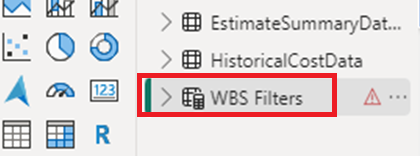
- These default WBS properties are common, but may or may not map accurately to the WBS properties as they exist in your database. It's possible that you will see an error symbol (
 ) next to the WBS Filters parameter table (as shown below) if any of the default WBS Properties do not map correctly.

- To fix this error or, more importantly, to add new WBS Properties to the WBS Selections list, you will need to edit the WBS Filters script (aka DAX - Data Analysis Expression) to point to the WBS Properties in your database.
- Click on WBS Filters:

- This will expand the DAX window, as shown below. Each line in the DAX corresponds to a WBS property in the WBS Selection list. You can edit an existing line, or you can add new lines to expand the WBS Selection list with additional WBS properties.

- The text in the square brackets is the pointer that maps directly to the WBS property that will be added.

2. Map Your WBS Property
- To change the mapping, highlight and delete the text inside the square brackets.
- Type any letter, and then delete that letter. This will automatically reveal a drop-down list of all the available columns in the Cost History table in your database.

- Simply click on the WBS Property that you want to map. There are two important things to note here:
- Not every column listed represents a WBS property; ensure you only select a column that you're certain is a valid WBS property.
- If you do not see a particular WBS property in the drop-down list, it's likely because it has not been used in any estimates. It is not enough for a WBS property to exist in Estimator - it must have been used in at least one estimate for it to appear in this list.
- Once you have selected your WBS property, you will see it automatically populated in the DAX inside the square brackets. Your WBS property is now mapped.
3. Name Your WBS Property Intuitively
- Next, we need to make sure your new WBS entry is correctly named in the WBS Selection list. The text inside quotation marks on the left corresponds to how the WBS property will appear in the WBS Selection list.

- Typically you will enter the name of the WBS property that you mapped earlier. But this text is flexible - it doesn't have to match exactly. Feel free to enter something that is intuitive and meaningful to you and your team.
Set the Sort Order Number
- Finally, make sure that the green number on the right correctly reflects the order in which the WBS properties should appear in the WBS Selection list. Make sure there are no duplicate numbers, and that the numbers are in order. Note that the first number is 0.

When adding or deleting lines in the DAX, be sure to maintain the format (or syntax) of the DAX in your new line. Things to pay attention to:
- Every line except the last line in the DAX should have a comma at the end, to mark the separation between it and the next line.
- Make sure you correctly iterate the sort order numbers at the end of each line.
- Make sure you maintain the same number and type of brackets and quotation marks.
- Click on the green check mark in the upper left of the DAX to save your changes (or discard all changes by clicking the red X):

- The process is complete, and you will now see your new WBS Properties in the WBS Selection list.
Lesson - DESTINI Estimator with Power BI - Cost History File
For a detailed guide to using the Power BI Cost History report, as well as an overview of what Estimator data is available for BI modeling, and how this data may be viewed in Power BI, please take the DESTINI Estimator with Power BI lesson via the Beck Tech training platform.