This article will explain how to move files - such as PDF drawings or report files - between your local PC into the Z Drive provided within the Hosted Environment using the copy-paste method, and why it is beneficial to do so.
Why?
We recommend that you store files like PDF drawings and reports in your Hosted Z Drive before loading them into a project within estimator. The main reason is performance - PDF drawings and estimate report files stored on the Z Drive will load/generate significantly faster in Estimator than those loaded directly from your local PC or your company share drives.
In addition, all users in your company can see and access files in your Hosted Z Drive. This makes it a great way for everyone to have access to the same report templates, while also making it easier for everyone to load the exact same PDF files into a project.
The File Explorer Tool
This guide focuses on the copy-paste method because it offers the fastest transfer speeds and is thus the best way to upload larger files. For smaller files (below approx. 20MB), users can opt to use the File Explorer Tool, which can be launched from the Remote Desktop dashboard. Read more about the File Explorer Tool here.
Uploading Files Using the Copy-and-Paste Method
The quickest way to upload files into the Hosted Environment is to simply copy-and-paste them into the Z Drive. This method is especially recommended if you're uploading a large file (or you have tried to upload the file using the File Explorer Tool and got an error). Here's how:
- First, make sure that the files that you want to upload are on your local hard drive, and not on a company share drive or cloud folder (folders that backup to OneDrive or other cloud storage can cause issues with the upload). Any files in those locations should be copied or moved to your local Downloads folder (not your Desktop or Documents folder - specifically your Downloads folder on your hard drive).
- Go to your Downloads folder, highlight the files or folder that you want to move to the Hosted Z Drive and copy them (right-click > Copy, or CTRL-C on your keyboard).
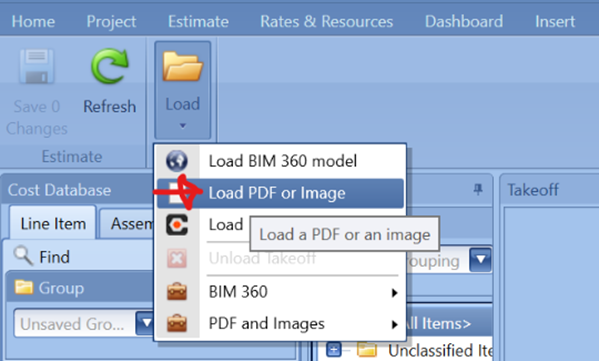
- Open Estimator and go to the 'Load PDF or image' option (or any option in Estimator that lets you load a file):
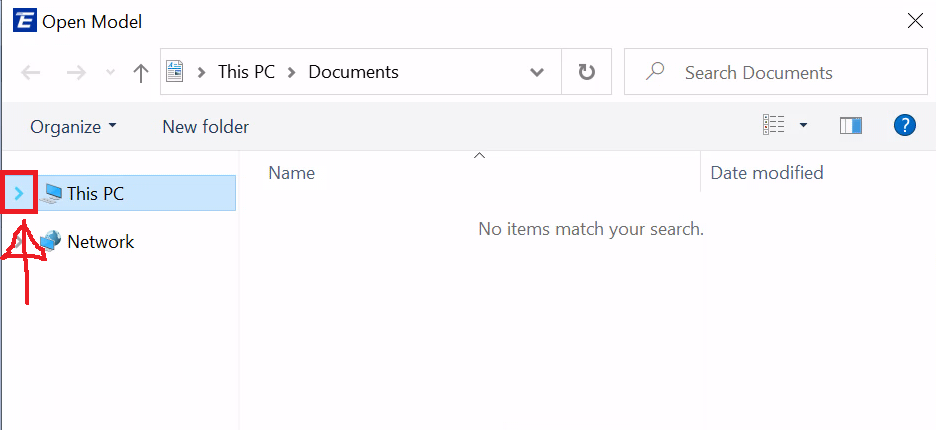
- In the Explorer window that pops up, expand the drive list by clicking on the small arrow to the left of 'This PC':
- Navigate to the Z-Drive. It should be the drive with the long name, located right below "Temporary Storage".
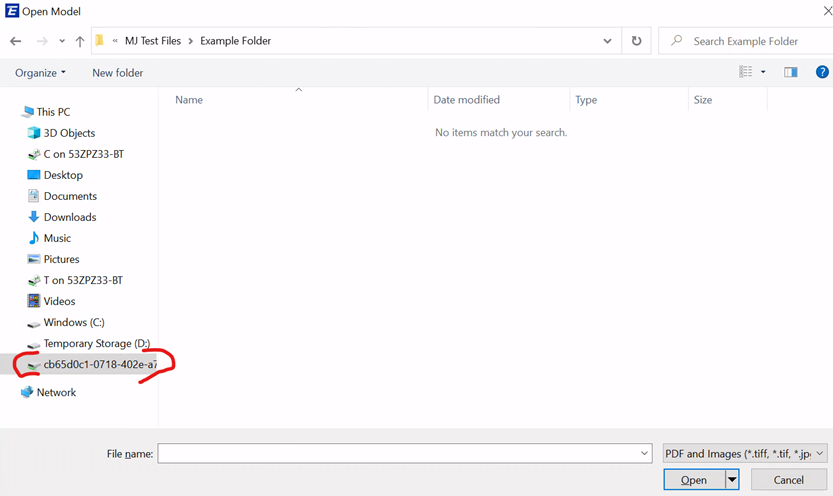
- When you click on the Z Drive, you will see its contents on the right. You are now ready to upload the files that we copied earlier. If you have a folder structure on your Z Drive, please navigate into the folder where you would like to upload the files.
TIP: This is the perfect time to create new folders if needed (right-click > New > Folder).
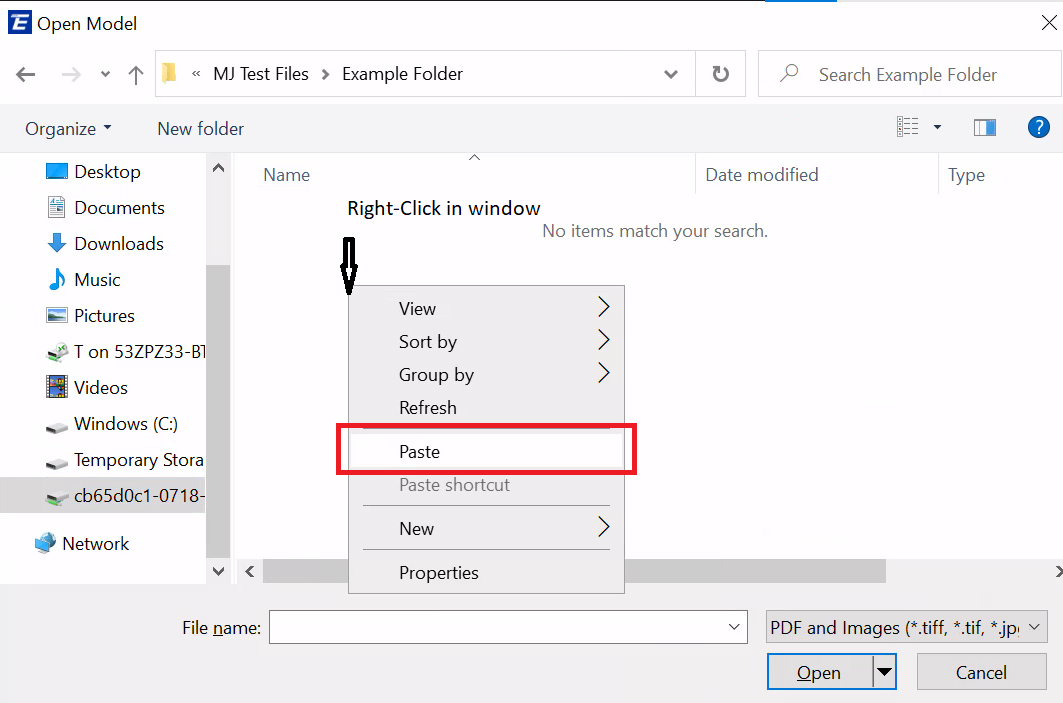
- Now in the desired folder, right-click inside the browser window and Paste (or simply press CTRL-V on your keyboard). This will start the copy process, moving the files that you copied in your downloads folder into the Z drive in the Hosted Environment.
- Once copied over, your files are now stored in the Z Drive and can be opened much more quickly in Estimator.
NOTE: You only need to copy files to the Z drive once. From then on, you should load your files from the Z drive into Estimator.
Here's a video example of the copy-paste method of uploading files to the Hosted Z Drive.
Downloading Files From the Hosted Environment Using the Copy-Paste Method
You can download files to your PC from the Hosted Z Drive simply by reversing the process described above for uploading. Effectively, you can copy-and-paste the data from the hosted drive to your local computer.
- Go to the Takeoff, Project, or Dashboard tab (anywhere in Estimator that lets you open a file) and click the Open File button for each respective view to bring up the Explorer Window.
- Expand the directory below 'This PC':
- Navigate to the Z-Drive. It should be the drive with the long name, located right below "Temporary Storage".
- When you click on the Z Drive, you will see its contents on the right.
- Right-click and copy the file that you would like to copy from your hosted environment, and then paste it into a folder on your local computer.
Can't See Your Files in the Hosted Z Drive?
Very Important - Depending on the file type, you may need to enter *.* into the 'File Name' field at the bottom of the window and then press Enter to see all the files in the folder.
Here's a video demonstration of downloading files from the Hosted Z Drive to your PC using the copy-paste method.
Other Methods
Alternative workflow for saving data from the hosted environment onto the local machine (quickly)
Create a mapped network drive on your computer to store outputs to
- On the local machine create a folder on your c drive to store outputs from the hosted environment
- In Microsoft Explorer right-click over your computer and select Map Network Drive
- On the Map Network, Drive dialog select a drive letter and map it to \\localhost\c$\<<folder>>
- Click Ok
Generating outputs from the hosted environment
In the hosted environment when generating outputs, you should see the new mapped network drive above. Select the mapped network drive as the location to store the output.
Once the file is loaded you embed the PDF using the steps in this article.
Also, you can use the Hosted File Explorer Tool.