This article provides comprehensive instructions, including videos and written steps, for setting up Estimator in the Hosted environment using the Microsoft Windows App on a Windows PC or Mac.
If your company does not support Microsoft Windows App at this time, please use the instructions in the following article to setup Remote Desktop: Subscribe In Remote Desktop
It is important to carefully follow each step, paying attention to the specific login credentials required.
Each section offers a video to watch or written instructions to follow.
New User Step-By-Step Guide
1: Download and install the Microsoft App
1.1 - Click the appropriate link below to navigate to the App Store for your PC and download the Windows App.
App Store Links
Windows PC: Click here to download the Windows App from the Microsoft Store
Apple Mac: Click here to download the Windows App from the Apple App Store
MSIX Download Link
For Clients who do not allow access to the Windows Store, you can download the latest Windows 64-bit installer from the Microsoft site at this link: Latest Windows App MSIX installer file
1.2 - For Windows PC users, locate the app in the Downloads folder and run it to install it. For Mac users, no installation is necessary - the Apple App Store download will automatically place the app in the Launchpad, ready for use.

1.3 - Launch the Windows App.
2: Log in to the Windows App:
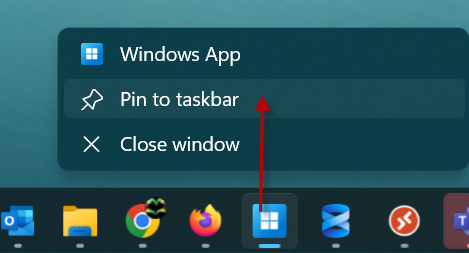
- 2.1 - Once open, right-click and pin the Windows App to the Taskbar:
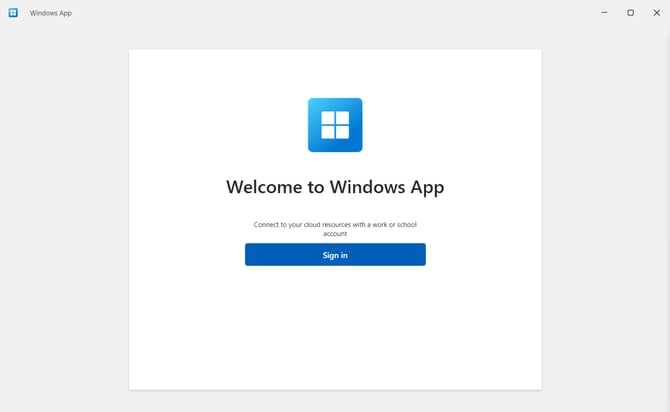
- 2.2 - Click the Sign in button.
Note: If you get the error that shows your company email and the message below, click your name/icon in the top-right and select "Sign in with another account."

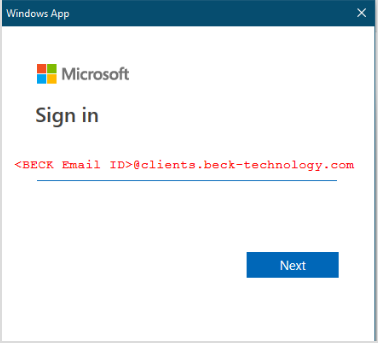
- 2.3 - Enter your Beck email address by copying (Ctrl + C) and pasting (Ctrl+V) into the sign-in window. If you encounter "This username may be incorrect..." scroll left to ensure there are no extra characters at the start of the Beck Tech email.
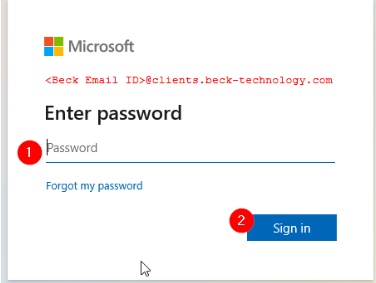
- 2.4 - Input your temporary Beck Email password and select "Sign In" (ensure there are no spaces when copying and pasting the password).
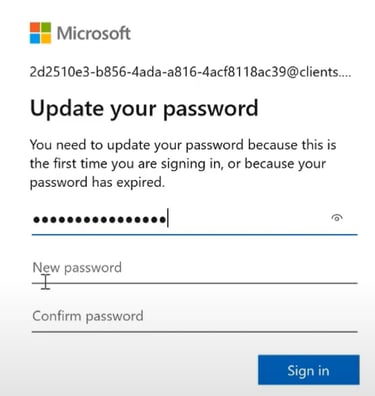
- 2.5 - Insert the temporary password, then establish your own password and select "Sign In." Ensure there are no additional spaces in the copied password by clicking the "eye".
Tip: Store your Beck Tech GUID email and password securely. They are crucial for accessing Estimator, and while daily entry isn't necessary, you will require them in the future to set up your access.
3: Set up Multi-Factor Authentication
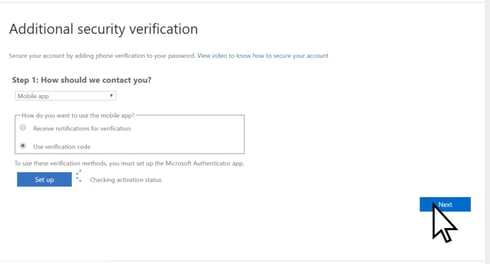
- 3.1 - Upon your initial login, you will encounter a prompt stating 'More information required.' This is necessary for setting up multi-factor authentication (MFA) on your mobile device. The following steps will be performed on both your PC and phone, with each step clearly indicating the relevant device.
- 3.2 - On your phone: Open the App Store (iPhone) or the Google Play App Store (Android). Search for and download the free Microsoft Authenticator app. Pay special attention to make sure the app you download looks like this:
-png.png?width=279&height=602&name=MicrosoftTeams-image%20(3)-png.png)

- 3.3 - On your PC: Click Next.

- 3.4 - On your PC: On the screens below, click Next, and Next again:


- 3.5 - On your PC: You will arrive at a screen with your QR Code (highlighted below). We will need this in a moment.

-
3.6 - On your phone: Launch the Authenticator app downloaded earlier. If it's your first time using the app, bypass the introductory guide and tap the large '+' to add your initial account. If you already have other accounts in the Authenticator app, manually add a new account by tapping the '+' icon in the upper-right corner. Then, choose 'Work or school account' and proceed to 'Scan QR Code'.


- 3.7 - On your phone: After clicking 'Scan QR Code' the app will ask for access to your phone camera. Allow it, and then point your phone camera at the QR Code on your computer screen. Line up the code with the transparent box. This will add your Beck account to your Authenticator app.


- 3.8 - On your PC: Click Next to proceed from the QR code page, and then Next again on the window below:
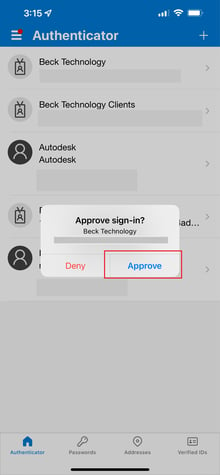
- 3.9 - It will now test to make sure the app is set up by sending a notification to your phone to approve. On your phone, click Approve button on the notification (you should see the notification on your phone whether or not the Authenticator app is open, but if you don't see the notification, open the Authenticator app to see it there).
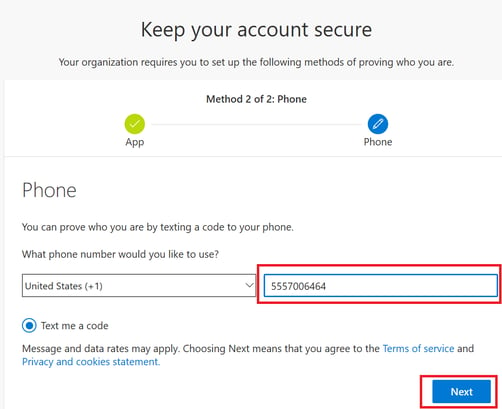
- 3.10 - On your PC: You should see that your approval on your phone is acknowledged, and you can move on to the next step. Now, we need to add your cellphone number. Enter your number in the empty box and click Next:
- 3.11 - You will receive a text message on your phone containing a six-digit code. Enter this code on your PC and click Next. This completes the MFA setup process.
4: Launch Estimator and Sign in to the License Window
- 4.1 - Your account is now set up and you should see the below notice. This is expected. Please move on to the next step.

- 4.2 - Click the Apps button on the left to see the DESTINI apps that you have access to (Estimator, File Explorer and, for some users, Data Manager).

Tip: We recommend that you switch to the Grid View, and then click the Favorites star on each app so you can access them from both your Apps or Favorites folders.

- 4.3 - Launch Estimator by single-clicking on the appropriate icon.
- 4.4 - The first time you launch Estimator, you may be prompted with a Windows Security sign in box. Enter your Beck Tech GUID password you created in Step 2 of this guide, and then check the Remember Me box before clicking OK.

- 4.5 - Once Estimator has launched, you will see the Web License window pop up. DO NOT sign into the license with your Beck email ending ‘@clients. Beck-technology.com’. Doing so will cause an error. Read the following section before proceeding.
Licensing for Estimator
NOTE: Since most clients will use Active Directory to sign in, that is the only step below. But more detailed information about signing into the license is here: How to Sign into the Web License Platform.
Once Estimator has launched, you will see the Web License login window.
- 4.6 - Click ACTIVE DIRECTORY and sign in using your corporate email and password (the same email and password you use to sign into your PC, or your company email, NOT the Beck email).

Issue: Active Directory Login Not Working?
-
If you are attempting to sign into the license window using the Active Directory option and it is unsuccessful, it may be due to your company not permitting Active Directory sign-in.
-
In this situation, you should opt for the alternative Sign up Now option - Refer to the instructions under 'Option 2' in the subsequent article - Sign up option to get a license.
5: Connect to your Databases
- 5.1 - For first-time users of Estimator, it is necessary to connect to your Cost and Estimates databases.
- Press the Connect to Database button in the top ribbon (highlighted as 1 in the below screenshot), and choose your cost database.
- Repeat the process for the data source database; click the drop-down menu on the right (highlighted as 2 in the below screenshot) and selecting your estimates database.
Tip: Most clients will see two databases in each list; one for training and one for production. If your company is new to Estimator, you will likely want to choose the Training databases for your training exercises. If you're a new employee at a company that already uses Estimator, please ask your manager which databases to pick.

New Setup Complete
You are now setup and ready to use Estimator in the Hosted environment. If you have any questions or concerns, please reach out to support@beck-technology.com and we will be happy to assist you.
New Computer or Re-Sign In Quick Start Guide
The below information is only for pre-existing users that need to set up again on a new or second computer. This is not for first-time users.
- Download the Windows App:
- For Windows PC users, locate the app in the Downloads folder and run it to install it. For Mac users, no installation is necessary - the Apple App Store download will automatically place the app in the Launchpad, ready for use.
- Once the Windows App is installed, open it.
- Once open, right-click and pin to the Taskbar:
- Click the "Sign in" button.
- If you get the below error that shows your company email and the message below, click your name/icon and "Sign in with another account."

-
Input your Beck Email (use Ctrl+V to paste it, then click Skip to bypass the Getting Started information). If you encounter "This username may be incorrect..." scroll left to ensure there are no extra characters at the start of the Beck Tech email.
- Enter your Beck Email password

- Your account is now set up and you should see the below notice. This is expected. Please move on to the next step.
- Click the Apps button on the left to see the DESTINI apps that you have access to (Estimator, File Explorer and, for some users, Data Manager).
- Ensure you are on the "Grid View" and choose each app you have access to and mark the "Favorites" star so you can access these apps from your Apps or Favorites folder.

- Launch the Estimator app, enter your password and click the Remember me option.
- In the license Window, use your Company credentials to log in using Active Directory or if you initially signed up to get a license, enter your Company email and password you created.
