IMPORTANT: A Note About Power BI Licensing
Power BI is a Microsoft product, and licensing requirements change regularly. All clients are responsible for independently assessing their specific licensing needs.
While a license is not required for a single user to view their Power BI dashboards, clients who intend to share dashboards to multiple users may need to purchase a single Power BI license for the user who will complete this setup process. Here is a summary of the current requirements at the time of writing:
- If you plan to share a dashboard with multiple users, you will need to publish your dashboard to a shared workspace. A single Power BI Pro license is required for a user to publish Dashboards to a shared workspace.
- All other users can access and view shared dashboards using the Free Per-User license, so you do not need to purchase Pro accounts for all other users who will simply view the dashboards.
- Clients who only intend for a single user to view the dashboards can do so with the Free Per-User license.
These details are subject to change at Microsoft's discretion. For your convenience, here is a link to Microsoft's Power BI License documentation: Power BI service per-user and capacity-based licenses
Beck Tech provides Hosted Environment clients with pre-configured Power BI report files for use with Power BI Online. Clients need to publish these files to a Power BI Online workspace in order to view the dashboard.
While publishing to a personal workspace allows a single user to view the dashboard, if you want to share access to other users, you will need to set up a shared workspace. This guide provides instructions for establishing a workspace in Power BI Online, how to publish your dashboard files to that workspace, and how to configure a scheduled refresh cycle so that the data is updated daily.
NOTE: This process should be completed using Power BI Online, not the desktop version of Power BI. Security measures that are in place to keep your data safe prevent the use of Power Bi Desktop.
If you have a specific need for using Power BI Desktop, please contact the Support team.
How to Publish Your Power BI File
- Send a request to Beck Tech Support for your Power BI files if you don't have them already. You will be sent one or more pre-configured files.
- If you plan to make the dashboard available for multiple users, you will need to have access to a shared workspace. Follow the steps through the following link:
- Follow these steps to upload your files to your shared workspace (note publishing files to s a shared workspace may require a paid license).
- Click on Workspaces.
- Click on the Workspace you created in Step 2 of this article.
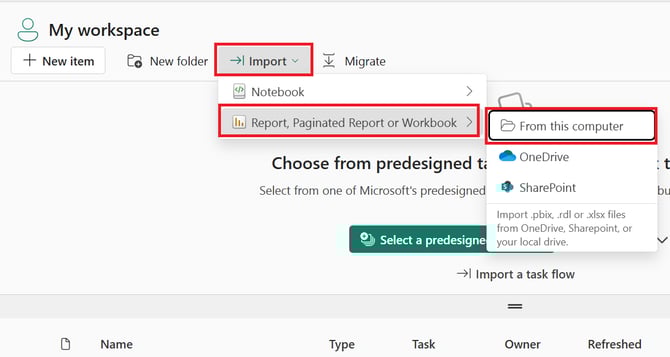
- Click Import > Report, Paginated Report or Workbook > From this computer
- Browse to the location where you save the files, highlight them and click Open.
- Click the following link for instructions to set up a Refresh schedule using the credentials provided in the same email as your Power BI Files from Beck Tech Support.
Note: If you are experiencing an issue with the map view, please check out this article - Map and Filled Visuals Are Disabled in Power BI - or reach out to Microsoft Support.
5. Read below for a list of useful resources that will help you get acquainted with the new dashboards and their
Using the New Cost History Dashboard
The Beck Tech Training Portal contains a module dedicated to Power BI, where you can learn how to use both the Cost History and Version Comparison dashboards, and more.
To get the best out of the new Cost History dashboard, you may need to set up the WBS Selection filters or replace Attribute Slicers. See the links below for instructions to do that:
- Customizing the WBS Selection List in the New Cost History Dashboard
- Replacing an Attribute Slicer in the New Power BI Cost History Dashboard
Modifying Your PBI Dashboard and Database Access
If you want to customize your PBI Dashboards or build your own from scratch, you will need to be whitelisted for direct access to the database. Please see this article for more information:
How To Set up the Power BI Yearly Cost Escalation Excel Workbook
We have a new workflow on how to show the Yearly cost index for projects, which can be found in this article.