The 'From Estimate View' report option allows users to generate a report that replicates the configuration/layout of their Estimate View.
This can be useful when you have configured your Estimate View with a layout to show the exact data needed for a deliverable - in a few clicks you can generate an Estimate View Excel Report with the exact same layout, perfect for a customized client deliverable, an in-house review report, or potentially as a data-dump for import to another tool.
Setup
1. Download the Estimate View Report template files from this article - Excel Reporting template download. If you download all of the templates as a zip file, right-click and extract them.
2. Place the report template files in a centralized location:
- Hosted clients are recommended to place report template files into a folder on their Hosted Z: Drive - this will allow all team members to access and run the same reports. If you're unsure, see this article for instructions on how to upload files to the Z: Drive.
3. Configure Estimator to point to the correct folder:
- Open the Preferences menu in Estimator (Home tab > Preferences).

- Locate the From Estimate View Reports option, and click the pencil icon to the right to configure the folder.
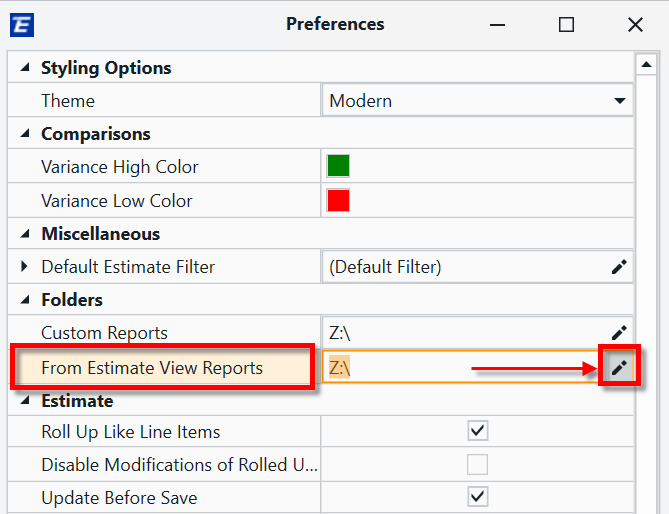
- Browse to the folder where you placed the report template files, highlight it, and click OK.
- Close the Preferences menu.
Running the Report
1. Navigate to the Estimate View.
2. Make sure that the layout of your Estimate View is configured to your liking - the Estimate View Excel Report will replicate this configuration.
3. Click on the From Estimate View button and select Formatted Report.

4. In the popup window, select the formatted report template you'd like to run and click Next. If you don't see any reports here, see the Setup section above.

5. Click Browse, navigate to the location you'd like the report file to be placed and give the file a name in the Filename field. Hosted users are recommended to select a location on their Hosted Z: Drive (the drive with the long name similar to below). Click Save to confirm.

6. Click Export. The report will be generated and saved in the location you selected.

7. The Report Complete screen gives you two options to open your report. This is an important step for Hosted users:
- 1 - 'Click file to open the report': This option opens the report in Excel inside the remote session on the Hosted PC (not on your local PC). Important - Due to licensing restrictions on Microsoft applications, this may not work for all users. If you have issues with Excel licensing via this method, see the next option.
- 2 - 'Show in folder': Recommended for Hosted users. This option will open a File Explorer window showing your report file in the location that you selected in Step 5. Right-click on the report file in select Copy. Then right-click on the desktop on your local PC, and select Paste. This will move the file to your local PC, where you can open it in Excel without licensing issues or having to login again.

8. Once you've opened your report, you can click Close to close the Report Complete window.
Lesson - Intermediate: Build an Estimate View Excel Report
If you would like a detailed guide on building and running custom Estimate View Excel Reports, a lesson is available via the Beck Tech Training Portal. Please email us to request access to that Lesson if you don't have it already.