Add Project Properties in a Standard Report
How to add project meta properties into your reports
Hosted Clients must contact Support to get the credentials necessary to update the report
This article will assist you in integrating project meta properties into your Standard Report. Specifically, we will focus on adding the Lead Estimator's name in the Page Header, as shown below:

Changing Report Connection Details:
Refer to the following recording for instructions on updating your report to connect to your database. To receive your connection details, please reach out to support@beck-technology.com.
Video Demonstration:
Detailed Steps:
1. On the Home Tab in Estimator, click on New Report to open Report Designer.
2. In Report Designer, click on the 'Open' button, then navigate to and select your report file to open it.

3. Once your Report is opened, Navigate to Field List and right click on ‘DESTINIData'.
4. Select 'Manage Queries'.

5. Click the Add to add a new Query.
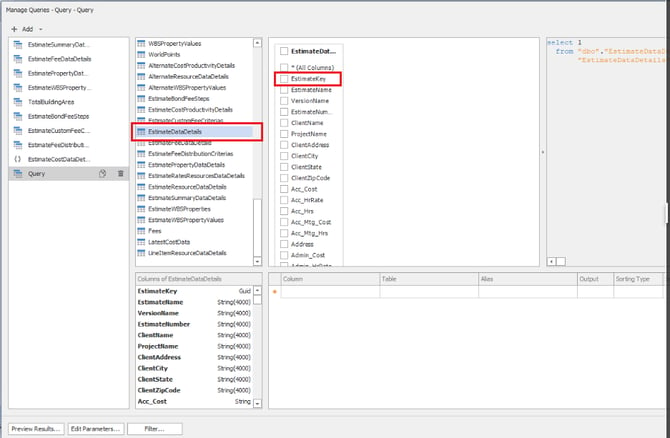
6. Scroll down the list to select ‘EstimateDataDetails’ and double click for the table to appear.
7. You can now select the project properties you need individually or you can simply select All columns. But if you are selecting only specific columns make sure you also select ‘EstimateKey’ in order to build relations with existing queries if needed.

NOTE: It is recommended to choose 'All columns' only when dealing with a small number of project properties.
8. Choose the Filter option to access the Filter Editor.
9. Click on + besides Add, to include a Filter.

10. Click on the little pen icon ![]() twice for a little question mark
twice for a little question mark![]() to appear and click on the text 'Select a parameter'.
to appear and click on the text 'Select a parameter'.
11. Choose Bind To and select EstimateKey.


12. Click OK on Filter Editor.
13. Rename this new query by double clicking on the name 'Query' to EstimateDataDetails (Optional).

14. Proceed by clicking OK on the Query Window.
15. Once you are on the Field list again, right click on 'DESTINIData' again and select 'Manage Relations'.
16. Establish a relation from EstimateKey of EstimateSummaryDataDetails table to EstimateKey of EstimateDataDetails using the click-and-drag method with the mouse.

17. Upon finishing, press OK on the Relations window to exit.
18. Click OK on the Query Window.
19. All the project meta data are now listed under 'EstimateSummaryDataDetailsEstimateDataDetails'. Look for 'Lead Estimator' and drag the field to the desired location on the Page Header for printing.


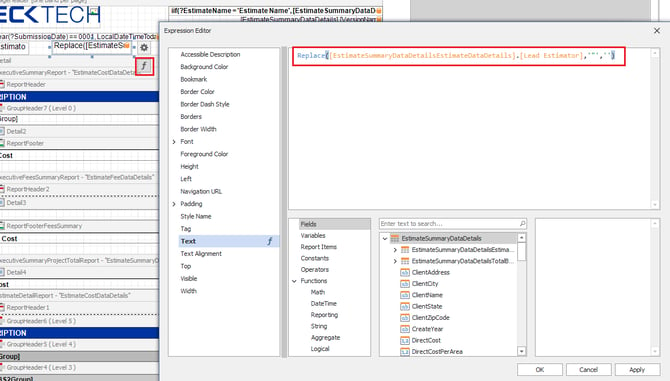
20. If you need to format the text values to print without quotes, you can click on 'f' and use the Replace function in the expression as shown in the screenshot below:

21. Save and run the report.

Want more content? Let us know by filling out our Training Ideas Submission Form