How To Print Your Takeoff
Printing from the takeoff view runs a dev express report with the image of the pdf and the drawn takeoff embedded in it. If the resolution of the loaded pdf is different from the default, it won't fit on the report and you may have to select the right paper size.
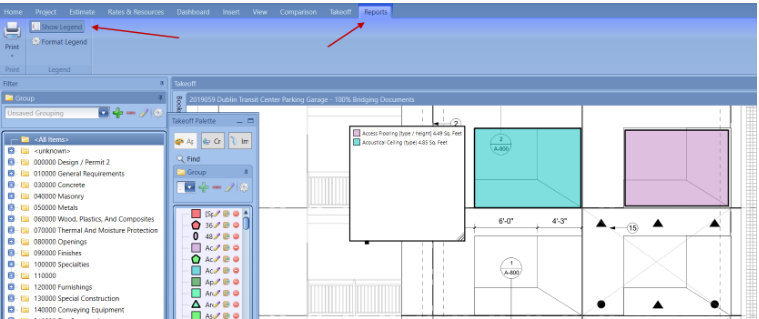
To print the takeoff in your estimate, go to the Report tab, click the Show Legend, and click Print or Print Preview.

As we continue to update the takeoff printing, there are some ways to get the takeoff to print better if the quality of Estimator is not clear enough.
Screenshot:
You can always use your Snipping tool (Windows application) or another third-party tool like SnagIt and simply screenshot your view.
Takeoff:
A Takeoff Report is installed on any new user's machine during the initial installation of the DESTINI Estimator. This will allow you to run a report that is essentially the same as your Takeoff Summary.
Hosted users can find the TakeoffReport.repx at the Standard Report link -Standard Report Link.
Print 2D via Reports Menu
You can also export a screengrab of your takeoff using the Reports tab inside the Takeoff View.
Takeoff Summary
You can copy the takeoff summary by selecting all items (Ctrl+A), copying them (Ctrl+C), and pasting the data directly into Excel (Ctrl+V).
To view all takeoff data for the project, ensure that "Summarize visible components only" is set to OFF as outlined in Step 1.
To customize your view, right-click any column header and select "Show Column Chooser." From there, you can add or remove columns to display the data you need as shown in step 2.


To remove a column you don't want to view the data, select the column header and drag it out until a red X appears, then release to remove it.

If you want to order the Component name in Alphabetical order, you can click the header to resort the Takeoff data.