WBS Properties
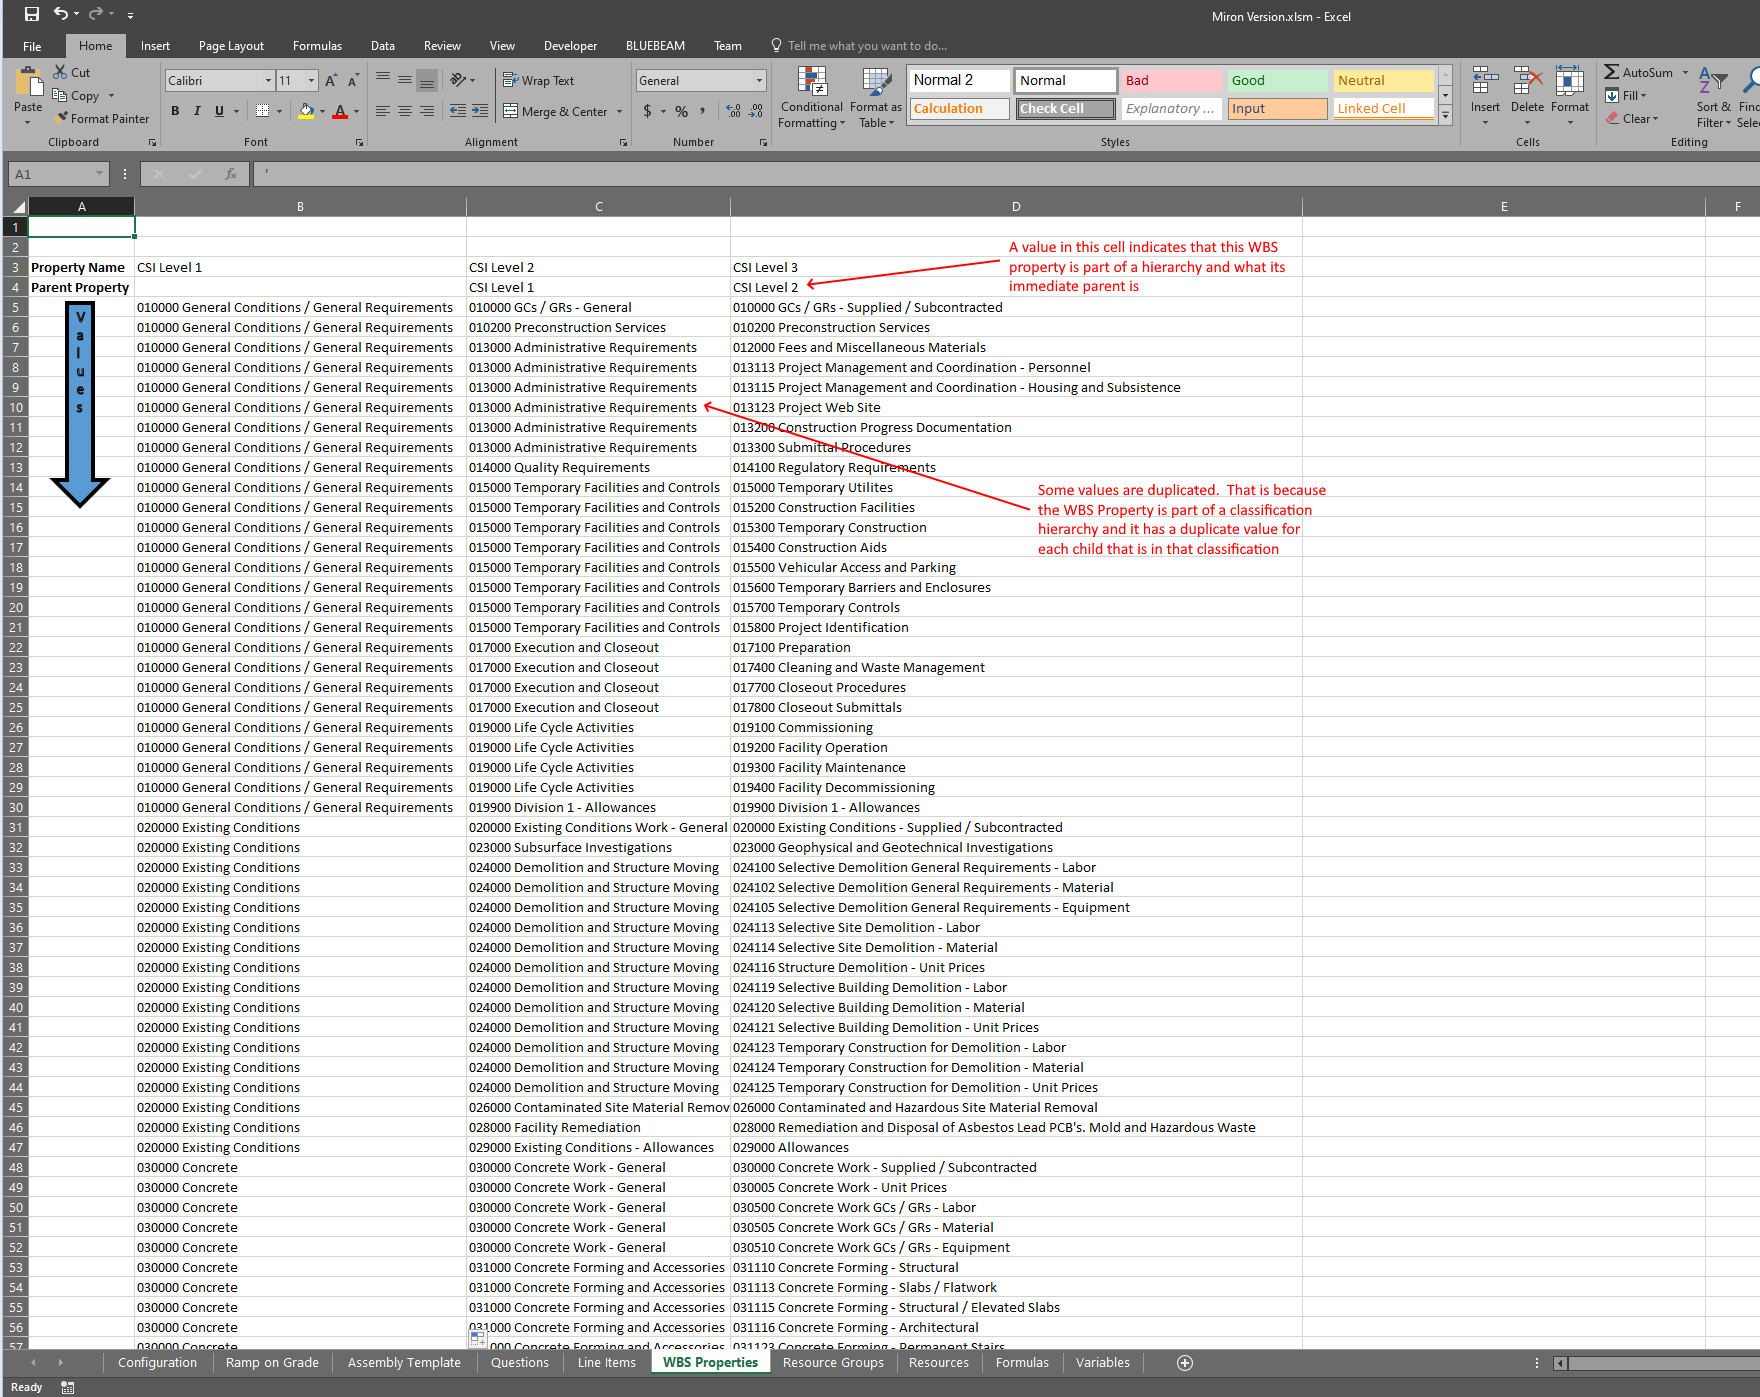
The WBS Properties sheet is pretty straightforward but there are a few things to note on this sheet. Strictly speaking, this sheet does not need to be filled out. All of the WBS properties and their values can be pulled from the Line Items if it is filled out, but completing this sheet first will help when classifying line items later.
The Spreadsheet Export ONLY supports WBS Types that are Text - meaning the other Types will not get exported in the spreadsheet

First, the WBS properties are organized into columns instead of rows like other data. All of the names of the WBS properties will be on row 3. The values for a specific WBS property will start in row 5 and continue down in that property's column.
You will notice that row 4 is labeled Parent Property. This row is used to set up a hierarchy for the WBS properties. For example, if you were working on the WBS property CSI Level 3, you would put CSI Level 2 as the parent property. There is functionality that will be discussed in the Line Items section that will allow you to enter only the lowest level WBS property and automatically fill out the higher levels. Specifying a parent property is how this is accomplished. The parent's value needs to be in the same row as the child to be consumed properly. This means that some WBS properties will have a value specified multiple times (once for each child of that value).
Line Items
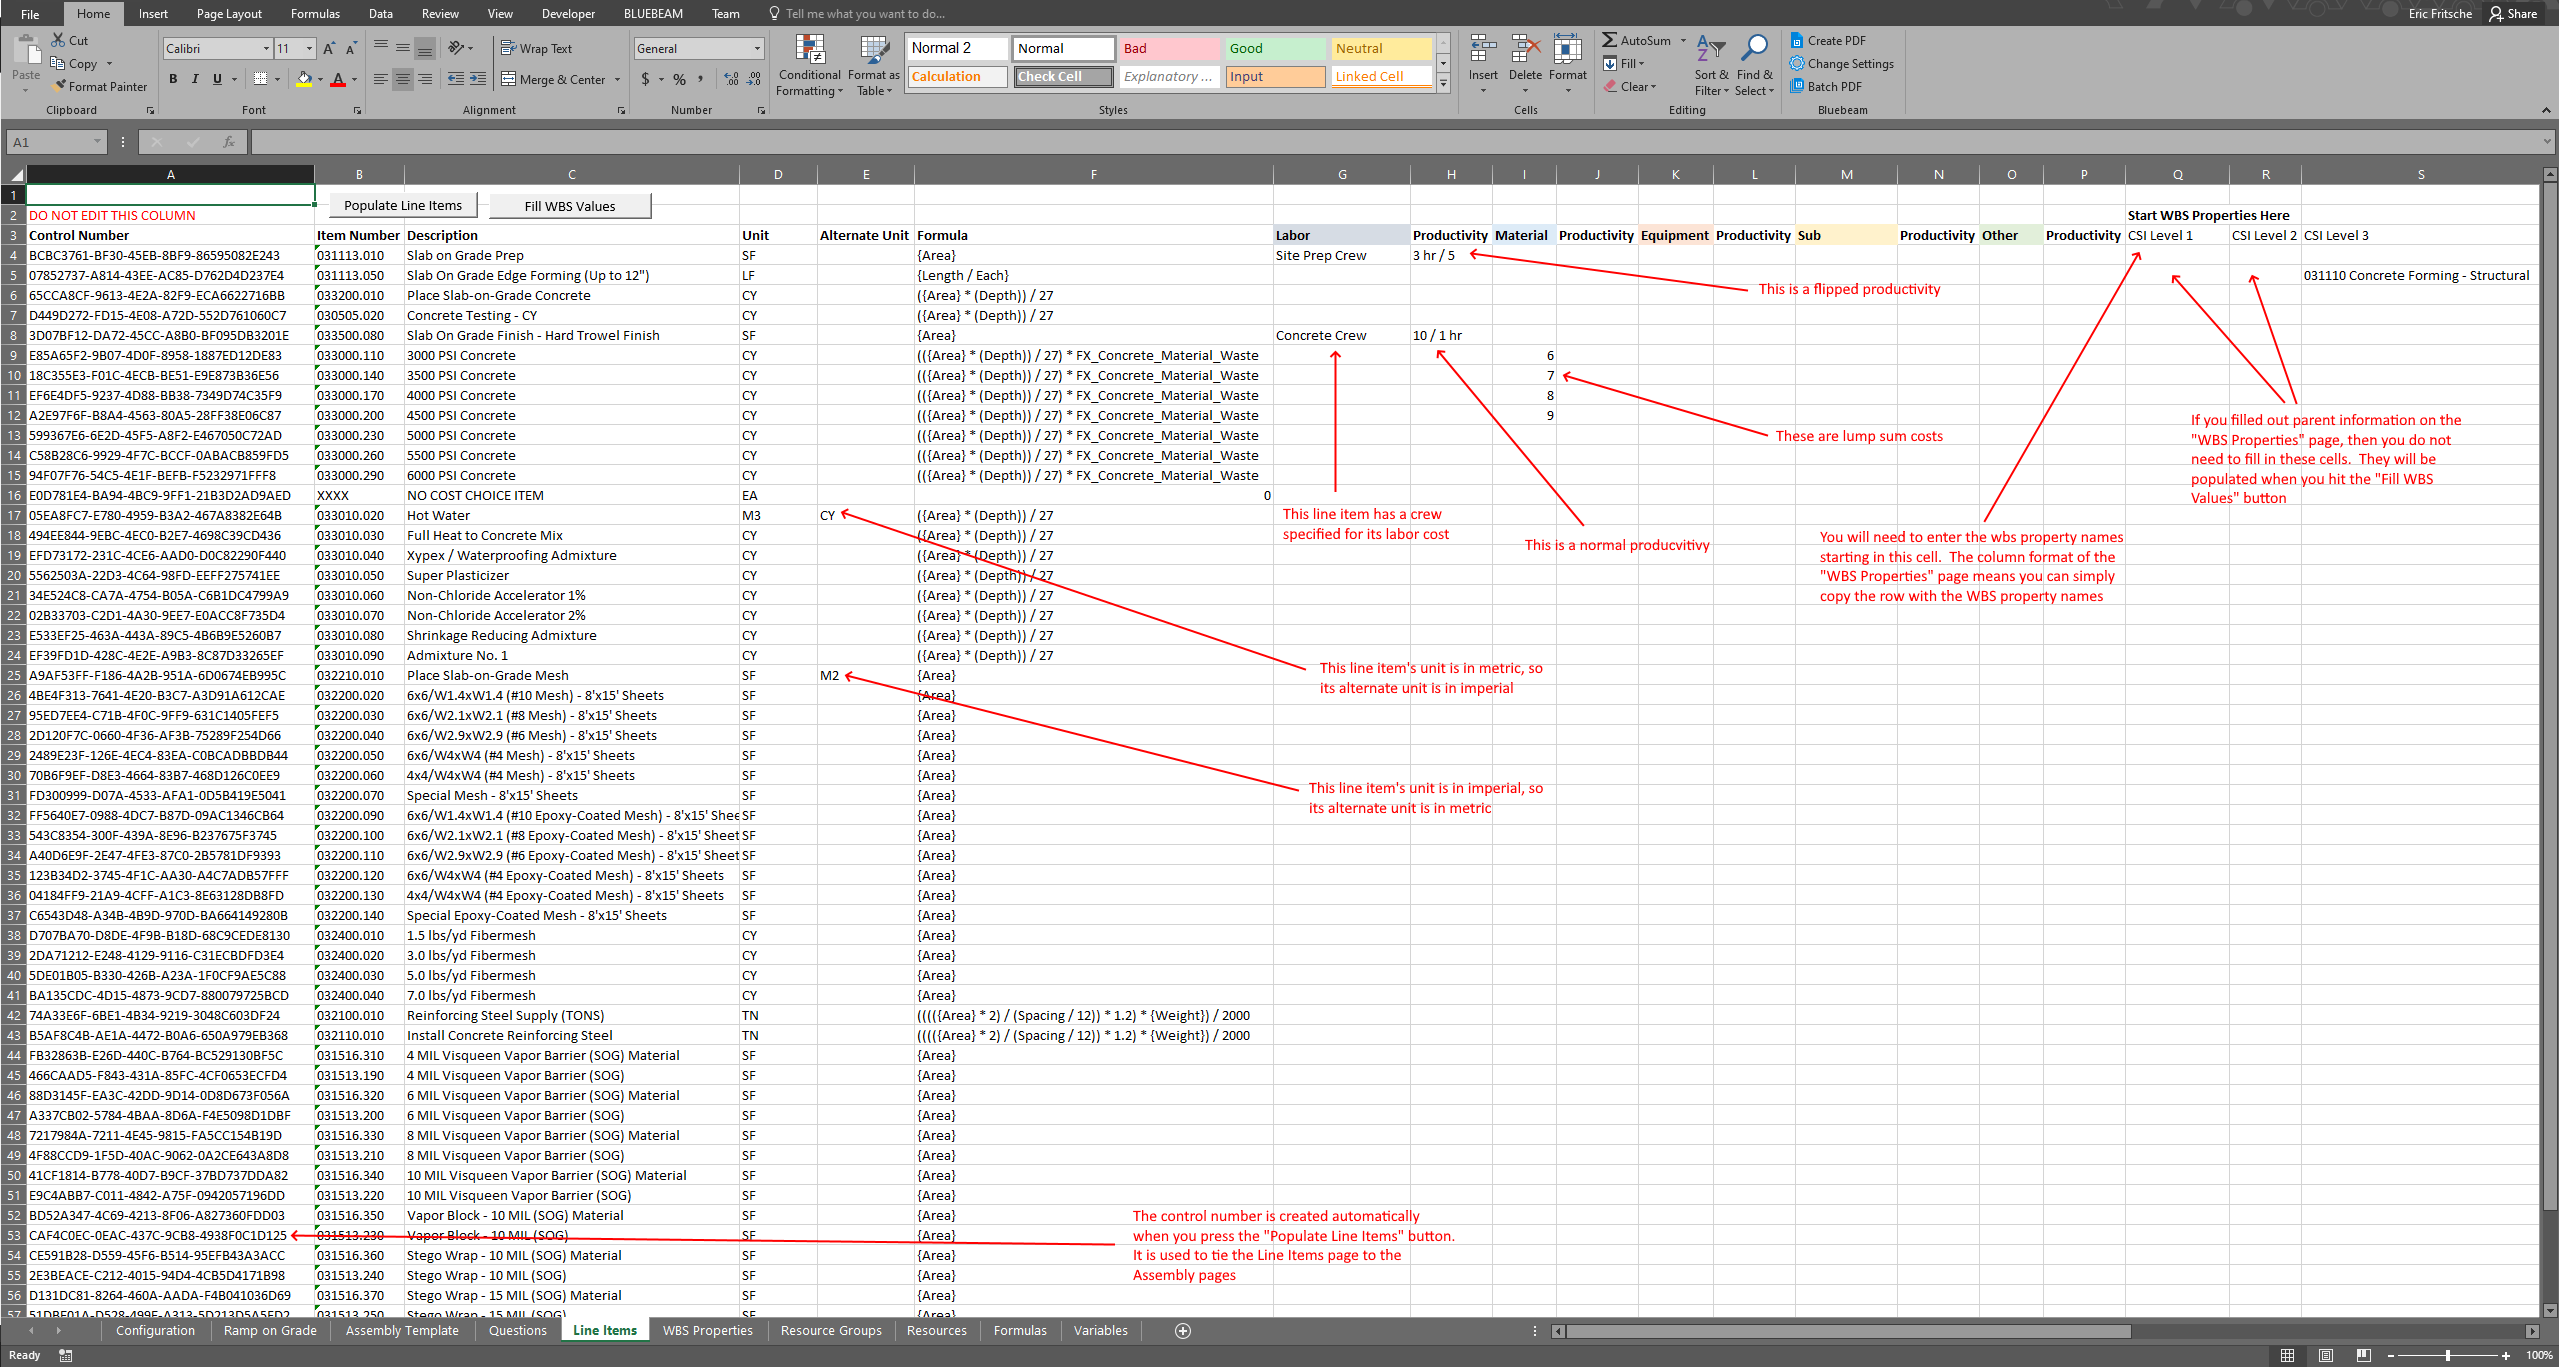
The Line Items sheet is where you can specify the cost and classification information for your items.
If you press the Populate Line Items button, the workbook will scan all of the assembly pages and add every unique Number/Description pair to the Line Items sheet. You can manually add line items that are not consumed by an assembly and those will get imported as well. Using this button will also fill in control numbers for line items in both the Line Items and assembly sheets.
The control number is the mechanism that is used to link line items between the assembly and Line Items sheets independent of their numbers and descriptions. If you make a change to an item number or description, you can open up an assembly sheet, hit the Update Assembly Items button at the top, and the workbook will line up the control numbers on the assembly page with those on the Line Items page and update the item numbers and descriptions on the assembly page to match. The power behind this is that it allows you to build out assembly templates and tailor the look and feel of the line items to match the needs of a specific client without having to rebuild the assemblies.
As with the assembly sheets, the unit and formula can be entered but are not necessary. Defaults will be created if they are left blank. If the item already exists in the database, leaving these fields blank will preserve the existing value.
The Alternate Unit column allows you to specify the line item's unit for the opposite system of measure implied by the value in the Unit column. For example, a line item with the unit SF can have an alternate unit of M2 but M3 and SY are invalid. In addition, both the unit and the alternate unit must have a standard defined either in the database or on the unit page of the spreadsheet for the alternate to be considered. Invalid alternate units are not imported.
The next set of columns is for specifying the costs of the line items. The Overview mentioned that if an item already exists in the database, a blank cell will preserve the value in the database and that is most useful here. If you need to update the costs for some line items, you only need to specify the values that need to be updated.
For the costs, you can enter either a number for a lump sum cost or the name of a resource group. Anything that cannot be parsed as a number in one of the cost category columns will be assumed to be a resource group and the import will create one to make the line item valid. If the cost is a flat price, then you do not need to specify anything in the corresponding Productivity column. If you have specified a resource group then you should fill out a productivity for it. The productivity supports both normal and flipped values, and the two valid formats are
[Work Amount] / [Time Amount] [Time Unit]
and
[Time Amount] [Time Unit] / [Work Amount].
If you do not specify a productivity or it is formatted incorrectly, you will get a productivity of 1 / 1 Hr.
The columns after the Other Productivity are reserved for WBS properties. the WBS Properties sheet has its data arranged as columns to make it easy to copy the WBS property names from row 3 and paste them here. If you did not fill out the WBS Properties sheet, that is OK. WBS properties will be created and populated with values based on what is filled out on the Line Items sheet. If you specified a hierarchy for any of the WBS properties on that sheet, then you only need to fill in the bottom-most value for your line items. You can press the Fill WBS Values button to automatically populate the higher-level values without having to enter them manually.
Rates and Resources
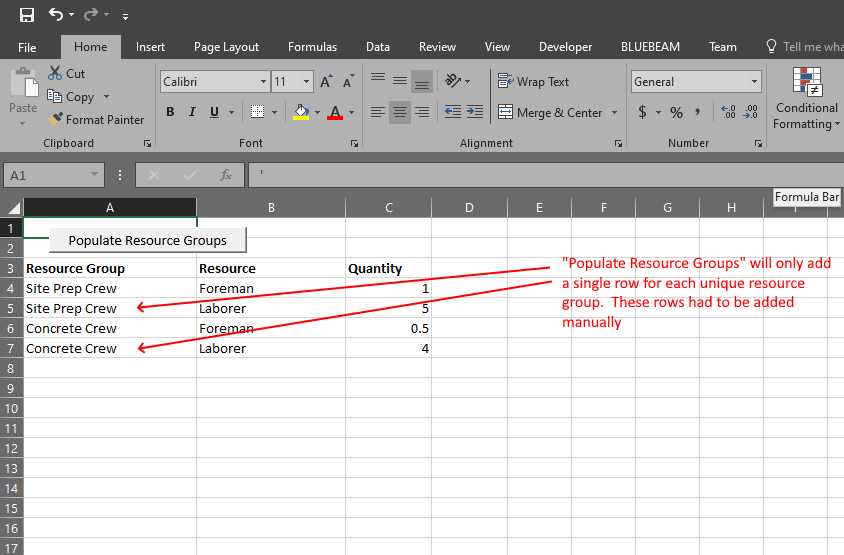
The Resource Groups page is where you define which resources are in the resource groups. Pressing the Populate Resource Groups button will pull every unique resource group from the Line Items sheet and add it as a row on this page. You may need to copy a resource group row multiple times to put more than one resource in it. If you do not specify resources for a resource group, a Placeholder Resource will be created by the import to make the resource group valid.
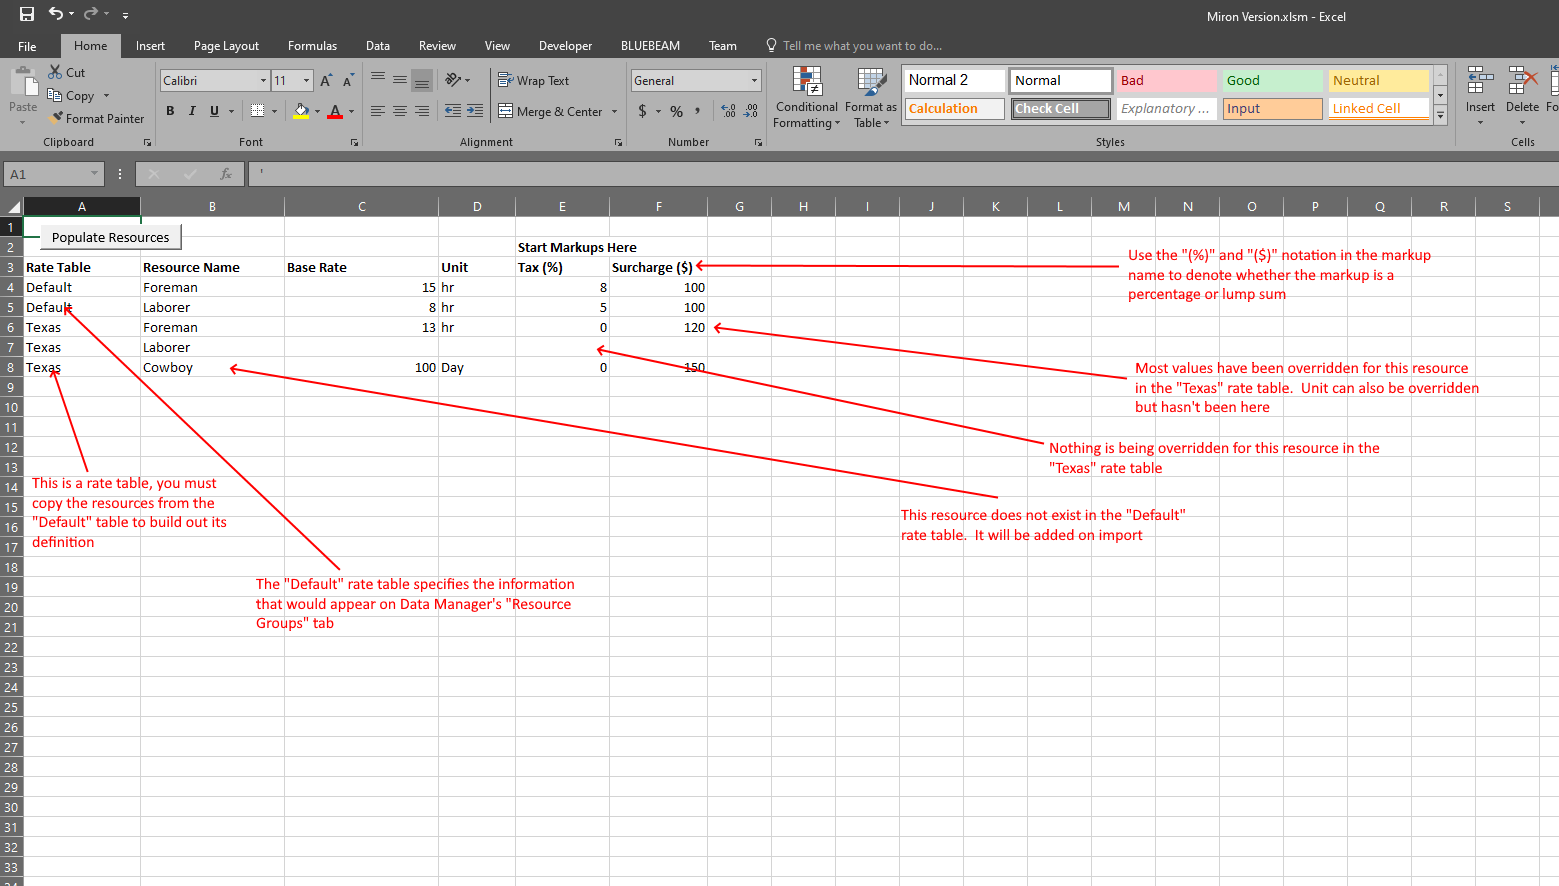
The Resources page is where you define rates and markups for your resources as well as rate tables and overrides. If you press the Populate Resources button, all unique resources will be added to this page in a Default rate table. Default is used to denote the base definition for the resources, or what would appear on the Resource Groups tab in Data Manager. A rate table will not be created named Default. You can specify a rate and unit for the resources here as well.
Markups are defined in a similar way as WBS properties on the Line Items sheet. The name of the markup goes in row 3 and the values for each resource are filled down. You must denote in the markup name whether the markup is a percent or lump sum. For percentages, use the format
[Markup Name] (%)
and for lump sums use
[Markup Name] ($)
To create a rate table, copy the resources that you wish to override and change the value in their Rate Table column to the name of the desired rate table. You must include at least one resource for a rate table to be imported, however, if you wish to create a rate table without overriding any resources, you can include a single row with a Resource Name but all other values blanked out. If you include a resource in a rate table that is not listed in the Default rate table, the import will automatically add it for you.
Click this link to go to Lesson 3.