This lesson will introduce you to the database creation spreadsheet and walk you through its format and the expected data that is required to successfully import the spreadsheet into Data Manager and build a cost database.
Note: This lesson is broken down into three sections that will address various sections in the Process. There will be a link at the end of each lesson to get to the next section.
Overview
The spreadsheet and database import is intended to be a mechanism that allows a person to quickly build out a cost database using an assembly-first workflow. The idea behind the structure of the spreadsheet is that you would start by creating assemblies and then use that information to waterfall down into more detailed sheets.
The spreadsheet is designed to be imported with as little information as you want to specify. This means, for example, that you only need to specify an assembly definition to have a valid import. Data Manager will create all the necessary supporting data to make the assembly valid. If an item is encountered on the spreadsheet that is missing required information, Data Manager will create a valid default to ensure data integrity. Conversely, if you only want to import something like line items or resource groups, you only need to fill out the appropriate sheets and the import will bring them in.
Multiple imports are also supported, allowing you to define some assemblies, import that works, then add more data into the workbook and import that again at a later time.
In the same vein, you can import into databases that have existing data. The import will only add new data or modify existing data - it will never remove data. The import will interpret any blank cells to mean "leave this data alone" if it already exists in the database. If you want to make a modification to a specific part of the database, you do not have to have the entire database in your spreadsheet, you only need to have the part defined that you want to make a modification to. This also allows for multiple people to work separately and then import into the same database without worrying about deleting the other person's work.
Very Important: The Import ONLY looks at the Item Number and Description column to determine if the two line items are similar, meaning - if two lines have the same Item Number and description, but different WBS Properties, then the import only sees one line item.
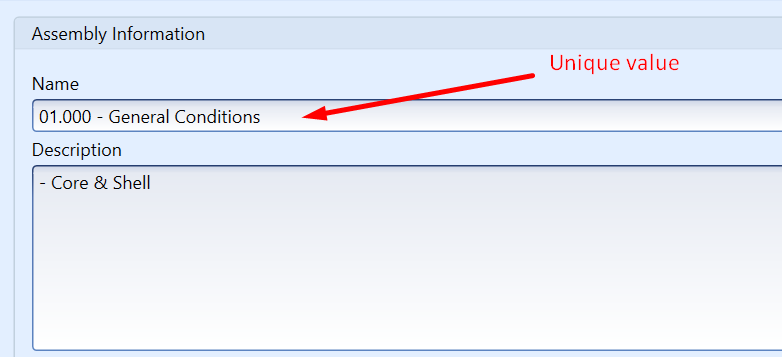
During Export, the Assembly Name is unique, therefore if two Assemblies share the same name but different Descriptions, the export will fail.
Data Manager Import/Export Buttons
Getting the data built into Data Manager is very easy. Simply connect to the database that you want to import into, click the Import button, and select the spreadsheet that you want to import. A pop-up will appear showing you the progress of the import. Data Manager will transact the process and roll back the operation if any errors are encountered during the process. Even though the import is designed to be tolerant of bad or missing data and Data Manager creates this transaction, it is still good practice to manually back up the database before running the import since it can make widespread changes to the data. When the process is complete, Data Manager will automatically reconnect to the cost database to show the imported data.
The export will take all of the data in the currently connected database and write it out to a copy of the database creation spreadsheet. It is important to note that the spreadsheet supports less functionality than Data Manager. If you export and then reimport into the same database, this should not be an issue; however, if you export and try to import into a new database, you will not get a 1:1 match between the databases.
The Create Blank Spreadsheet will create an empty database creation template for you to use if you need a clean starting point to make a new database.
Configuration Tab

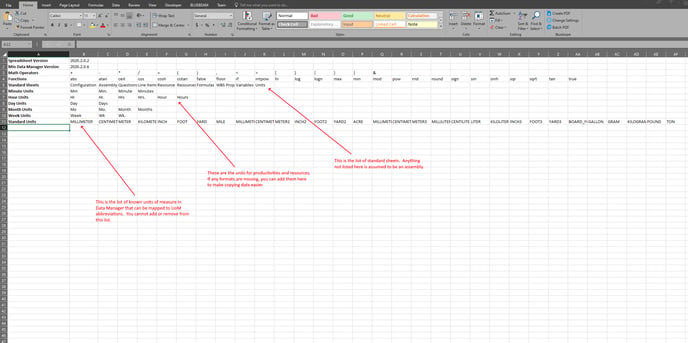
*Standard Units - This is the list of known units of measure in Data Manager that can be mapped to UoM abbreviations. You cannot add or remove from this list.
*Hour Units - These are the units for productivities and resources. If any formats are missing, you can add them here to make copying data easier.
*Standard Sheets - This is the list of standard sheets. Anything not listed here is assumed to be an assembly.
The final page of note is actually the first one in the list - the Configuration page. In general, you should not need to modify this page, as it is used by the workbook and import to function properly, but there are a few reasons why you might need to.
You will notice that there are five rows for Minute, Hour, Day, Month, and Week Units. These are the time units of measure that are used to parse the productivities and the resource units. Several common ones are predefined in this sheet, but if you encounter one that is not listed you can add it to the appropriate row.
You will also see a row labeled Standard Sheets. The workbook and import assume that anything that is not a Standard Sheet must be an assembly and will try to import it as such. If for some reason you need to add a new sheet to hold additional data, you must add its name to this row so that it is ignored by the import.
The final row is the list of Standard Units. This is the list of known units of measure that can be mapped to unit abbreviations. This list should match the list programmed into Data Manager and you should not add or remove from it.
Assemblies
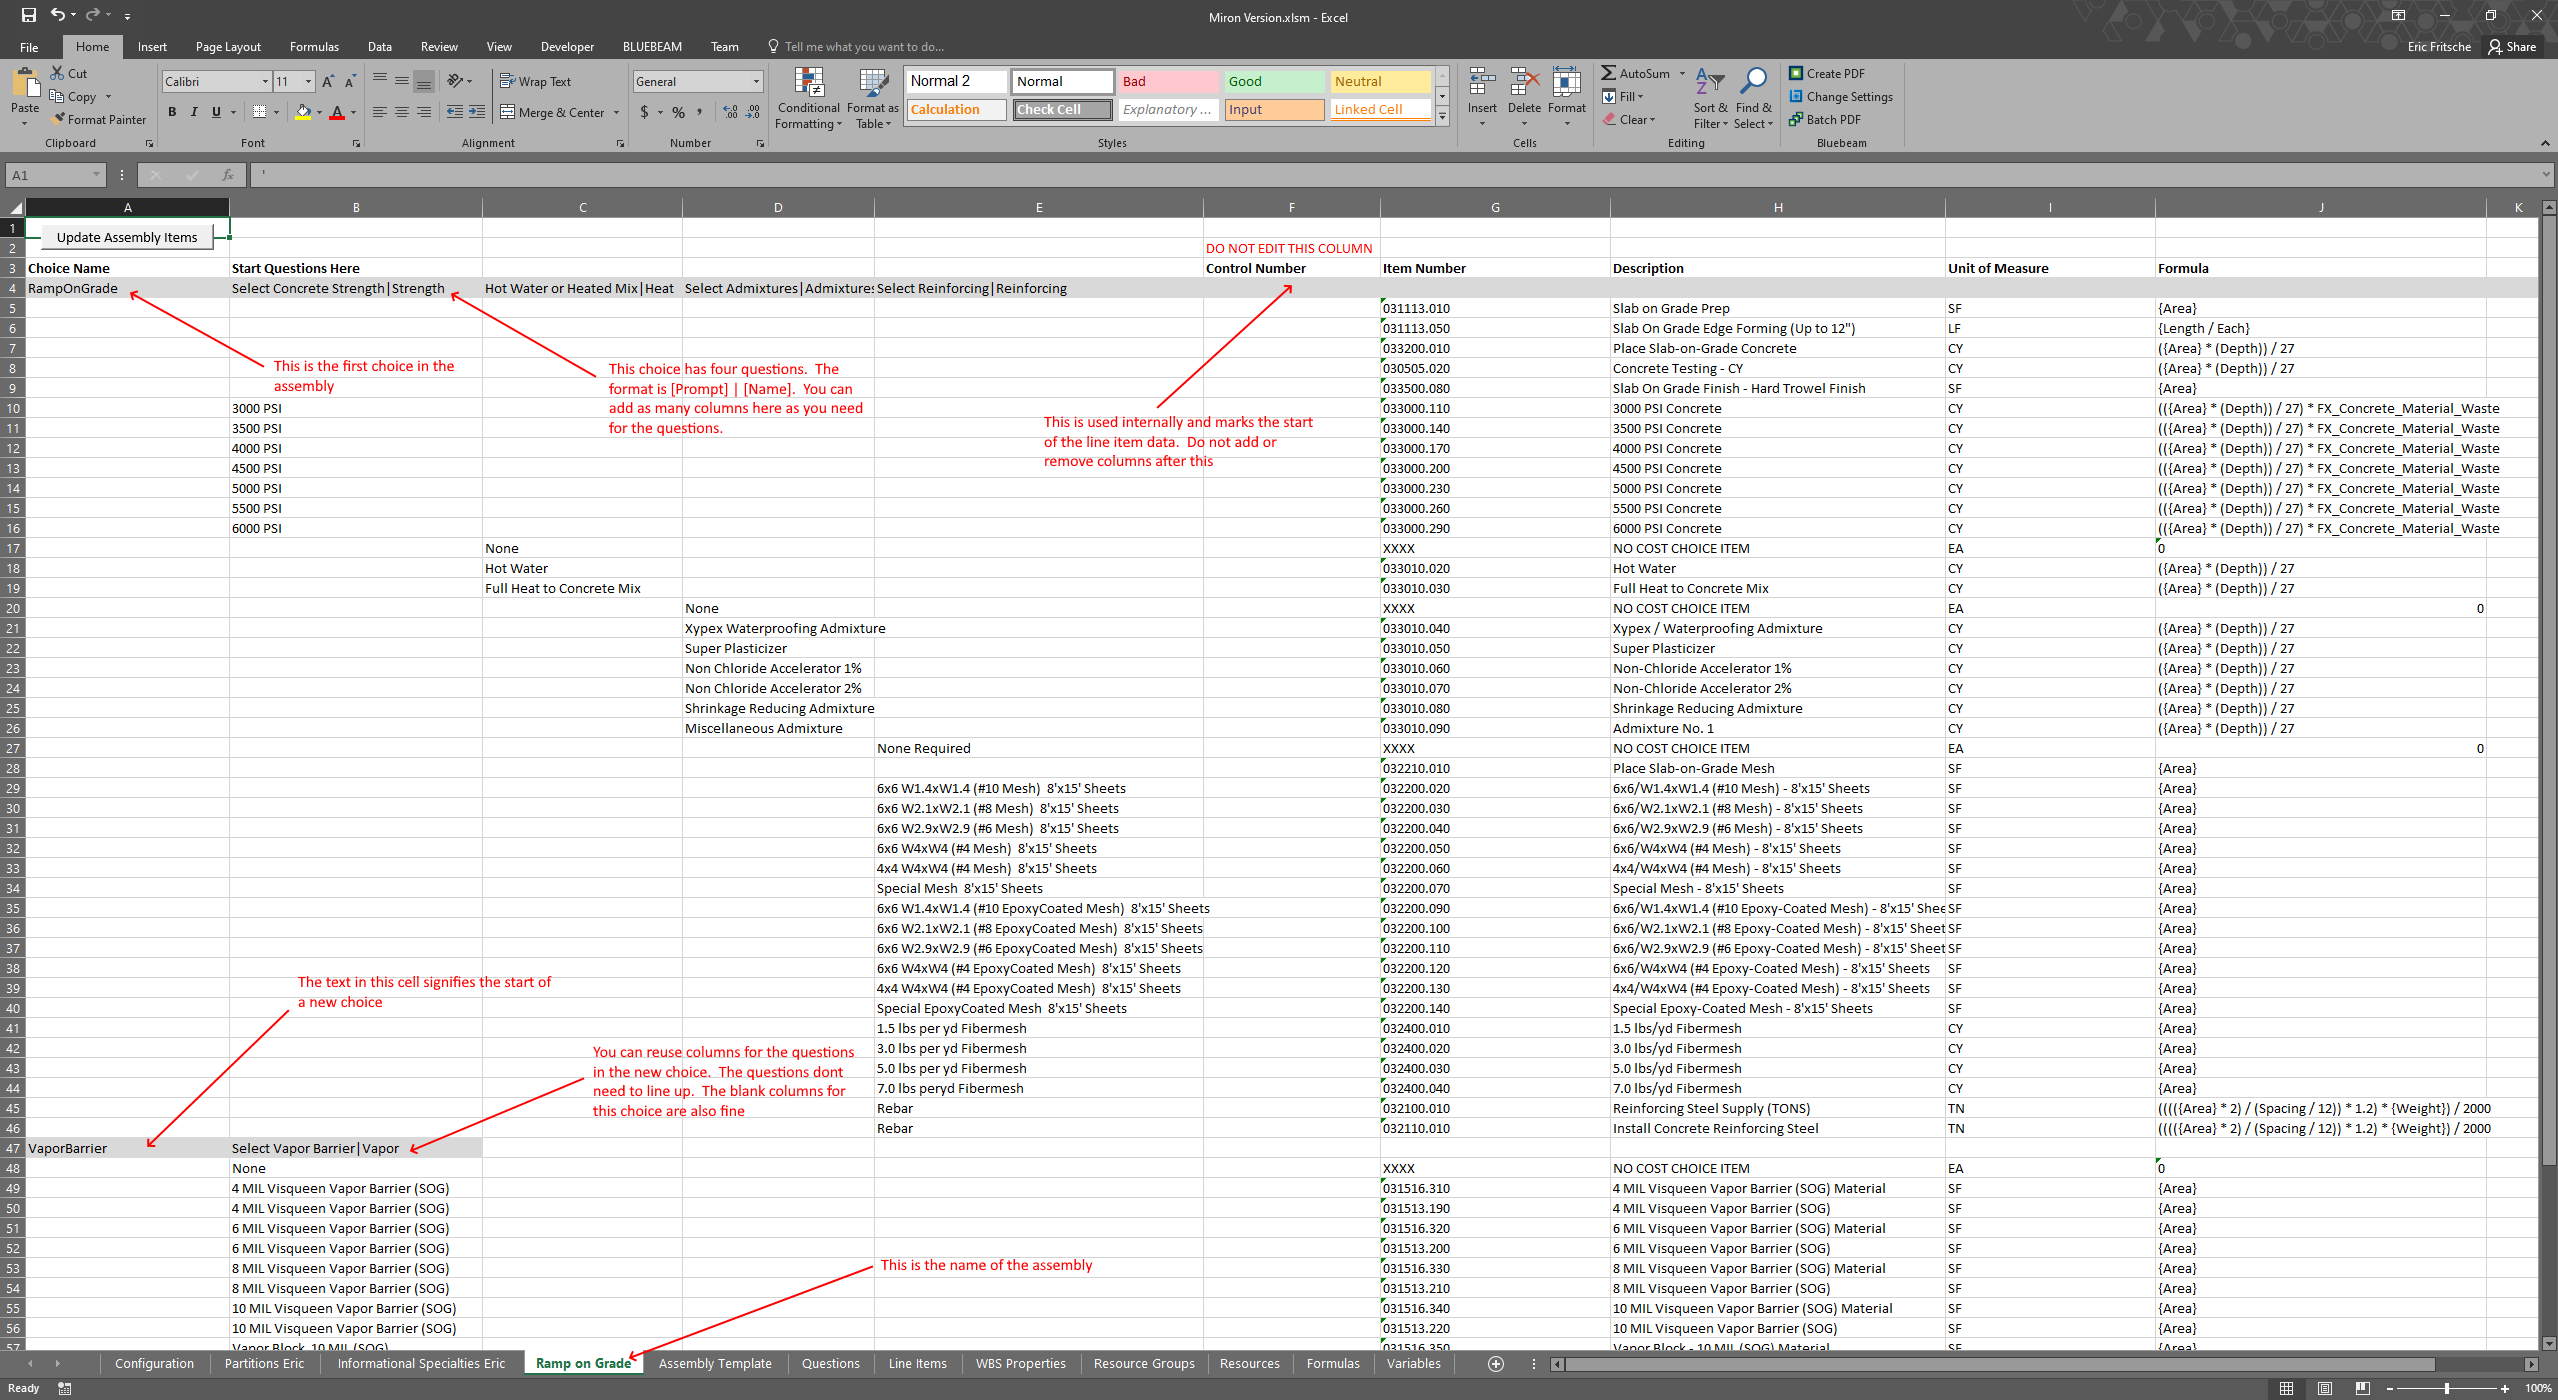
*RampOnGrade - This is the first choice in the assembly
*Start Question Here - This choice has four questions. The format is [Prompt] [Name] You can add as many columns here as you need for the questions.
*Control Number - This is used internally and marks the start of the line item data. Do not add or remove columns after this.
*Vapor Barrier - The test in this cell signifies the start of a new choice
*Select Vapor Barrier - You can reuse columns for the questions in the new choice. The questions don't need to line up. The blank columns for the choice are also fine.
*Ramp on Grade Tab - This is the name of the assembly
The assembly pages are going to be the primary location where information is imported from. While it is not required, the workbook's assembly-first design means that you will most likely want to start by defining assemblies.
When you open a new spreadsheet, you will see a page called Assembly Template. You won't actually define your assembly on this page, instead you will copy this page and use that copy. The name of the new page should be the name of the assembly.
The first column of the assembly page is the Choice Name. It is probably self-evident, but you will put the name of the choice you are building in this column. You can build multiple choices into the same assembly and the import will assume that each populated cell in the Choice Name column must be starting a new choice - so don't fill down with your choice name.
The next column prompts you to Start Questions Here. You will put your first question directly under that prompt and you can add as many columns as you want between there and the Control Number column to account for the questions that need to be in your choice. You should not add any columns after the Control Number. Each choice is completely self-contained, so when you start a new choice, you can reuse the question columns to define the unique questions for the new choice. Blank question columns will not adversely affect the choice. You must specify the prompt and name of the question in that cell. The format is:
[Prompt] | [Name]
The Control Number column says DO NOT EDIT THIS COLUMN. You should follow that instruction.
You will use the rows between one choice and the next to define the line items and question answers that apply to those line items. You are required to enter an item number and description into the respective columns. Any row missing those will be ignored on import. You can also specify a unit and formula for the assembly item but it is not required. If you leave it off and the unit and formula are already specified for the line item in the database or on the Line Items sheet, then that will be used, otherwise, a default will be assigned to the item.
The spreadsheet import does not support adding line items to the assembly that is not in a choice. There are two workarounds to this. You can either build a dummy choice that always includes the line items, or you can add the line items to the assembly after importing it.
At this point, you can import the spreadsheet and create a completely valid cost database.
Questions
The next sheet that you will probably interact with is the Questions sheet. This sheet is where you can define the prompts and ask-whens for the variables and choices in your assembly.
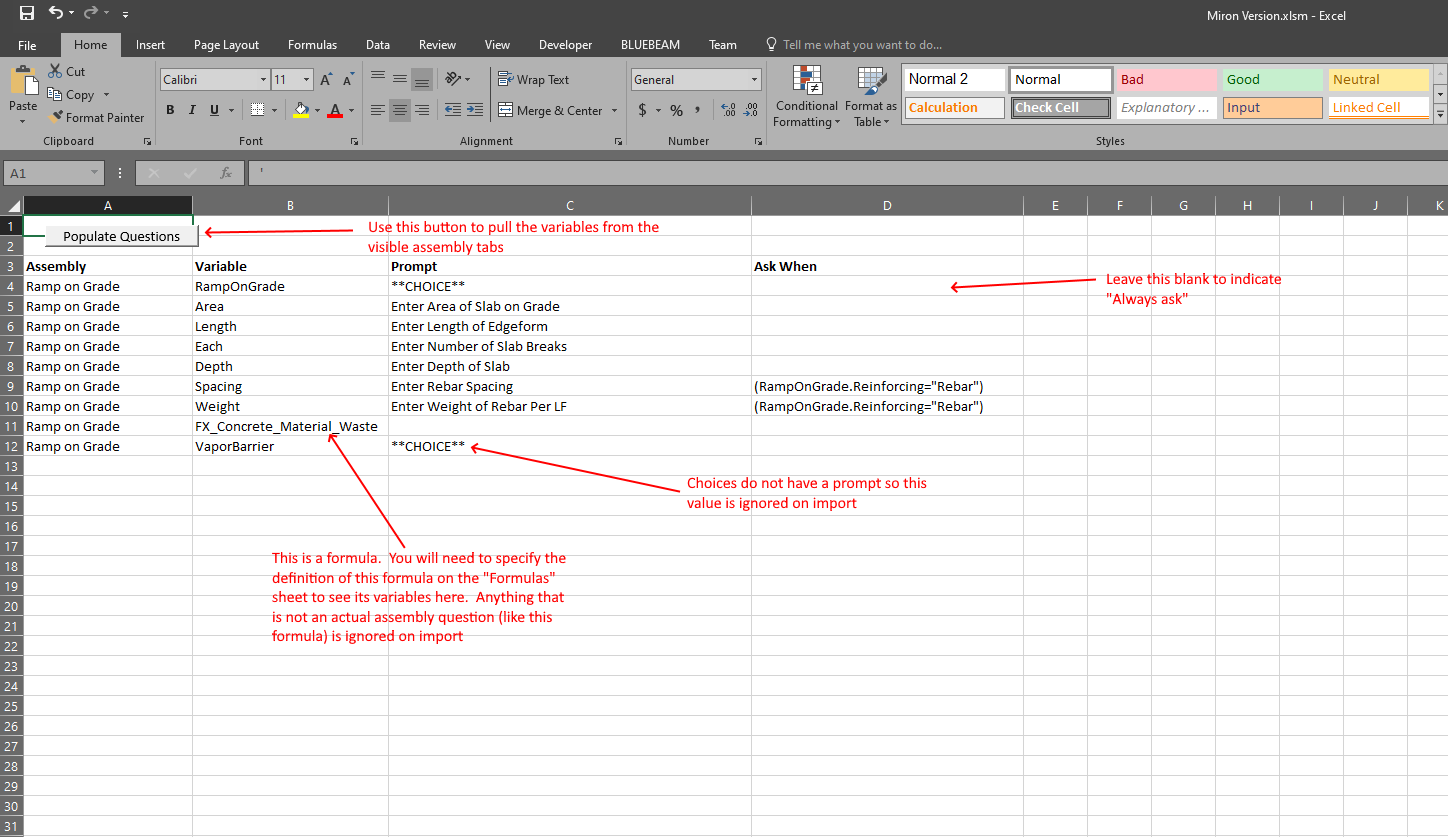
If you press the Populate Questions button at the top of the page, the spreadsheet will scan all of the assemblies and put all of the choices and line items variables on this page. Since the macro will only add questions that are not already included on the Questions page, you are safe to run the macro multiple times as you build out your assemblies.
As you build out your assemblies, you might find that you have obsolete questions left around on the Questions sheet. Pressing the Populate Questions button again will not automatically remove unused questions. These extra questions will not cause a problem on import and you are free to either leave them on the page or delete the row if you prefer not to see them.
If your line items reference nested formulas, you will need to specify them on the Formulas page to have their variables show up as questions here. If you do not do that, the formula name will show up as a question on this page. Like with obsolete questions, the formula name will be ignored on import, and questions will be created for each of its variables, but you will have to specify prompts and ask-whens in Data Manager.
The order of the questions will be determined by their order on this page. Simply move the questions around into the desired order and they will be imported that way
Click this link to go to Lesson 2.