This article provides a step-by-step walkthrough for how to customize your report to show Project Property values. In this example, we will add the Client, Construction Duration, and Total Site Area as default Project Properties to the standard Owners Report, and the option to dynamically change the properties list when running the report.
Using a dynamic parameter, pictured above, you can add whichever Project Properties you choose, and we will explain how in this guide.
Open Your Report in Report Designer
-
Launch Estimator and open any estimate.
-
On the Home View, click the New Report button on the main ribbon. This will launch Report Designer.

-
In Report Designer, click the Open button, then navigate to and open your report template file (.repx). In this example we will be editing the standard Owners Report template file.

Configure a New Parameter
The following steps are all performed in Report Designer.
- Click on the Field List tab on the right, and then right-click on Parameters and select Edit Parameters.

- Click +Add to add a Parameter and locate the new parameter at the bottom of the list.

- Click on the new parameter to show its options on the right.
- Fill in the following fields:
- Name: Name your parameter. In our Example, we name it ProjectProperties.
- Description: This is the user-facing parameter label that will be exposed to users when running the report (example label: Project Property).
- Type: String
- Allow Null: Check this box.
- Allow multiple Values: Check this box.
- Default Value: This is where you will list the Project Properties that you want to expose in your report. Separate each property with a comma but no space after the comma. Spellings must be an exact match for the Project Properties list found in your Estimate Project View.
- Value Source: Dynamic List
- Data Source: DESTINIData
- Data Member: EstimatePropertyDataDetails
- Value Member: Property
- Display Member: Property
- Sort Member: Property
- Sort Order: Ascending
- All other fields can be left as their defaults. Your options should look like the screenshot below:

IMPORTANT: Pay special attention to the Default Value field above.
- This is where you will list the default Project Properties that you want to expose in your report.
- Separate each property with a comma but no space after the comma.
- Spellings must be an exact match for the Project Property list found in your Estimate Project View.
- This list will be available to users at report runtime through a new parameter, enabling them to add or remove Project Properties dynamically.

- Click OK.
Create a New DetailReport Band
- Right-click on the PageHeader band at the top of the report and select Insert Detail Report > Unbound

- Scroll to the bottom of the report to locate the newly added DetailReport band.

- Click the DetailReport band header, and then click the Gear icon to the right to open the Detail Report Tasks window.
- Fill in the following fields:
- Data Source: DESTINIData
- Data Member: EstimatePropertyDataDetails

- In the Filter String field, click the ellipses to open the FilterString Editor.

- Hover over the 'And' statement and then click the + button and select Add Condition.

- Configure the FilterString as shown below.
- NOTE: For the 'ProjectProperties' statement in green, you need to click the little pencil icon twice to turn it to a question mark. Then click the box to reveal a list of the Parameters in the report, and select the new Parameter you created at the start of this guide (in this example, "ProjectProperties"):

- Click OK to close.
Populate the New DetailReport Band
- Right-click the DetailReport band header and select Insert Band > ReportHeader.

- In the Standard Controls panel on the left, drag and drop a Table into the newly created ReportHeader box.

- Type 'Property' in the first cell, 'Value' in the second, and right-click and delete the third cell, since we only need two columns. It should end up like this:

- Hover over the table and click the
 symbol on the upper left to select it.
- Drag the selected table out to the width of the report.

- Click the ReportHeader1 band to select it, then drag its lower edge up to the bottom of the table to resize it perfectly.

- Select the table again by clicking the symbol on the upper left of the table.
- Press CTRL-C to copy it, click into the Detail11 band below and press CTRL-V to paste the table. You should now have two tables, both with Property and Value cells.

- Click the 'Property' cell in the lower of the two tables, and click the Gear icon to reveal the Table Cell Tasks window.

- Click the dropdown in the Expression field and select Property.

- Click anywhere outside the Table Cell Tasks window to close it.
Click the 'Value' cell of the lower table to select it, and then click the gear icon to reveal the Table Cell Tasks window. 
- In the Format String field, copy and paste the following:
-
{0:n0}
-

- Click the ellipses in the Expression field to open the Expression Editor.

- Paste the following into the Expression Editor window.
Iif(

Contains([value], '"'),

Replace([Value], '"', ''),

ToDecimal([Value])

)
- It should look like this:

- Click OK to close the Expression Editor.
- Click on the Detail11 band to select it, then drag the lower edge of it up to the size of the table, similarly to earlier. It should now look like this:

- Click on the header of the Detail11 band to select it, and then click the gear icon on the right to open the Detail Tasks window.

- Click the ellipses in the Sort Fields box to open the Group Field Collection Editor window.

- Click Add.
- Click the empty cell next to Field Name and select Property.

- Click OK to close.
The Finishing Touches
- Right-click on the header of the DetailReport - "EstimatePropertyDataDetails" band and select Edit and Reorder Bands...

- In the Report Editor window, select DetailReport in the list, then click the up arrow to move it up to be just below the Executive Summary.

- Click Close.
- Scroll up in the report to locate your DetailReport - "EstimatePropertyDataDetails" band, now in its new location below the Executive Summary.
- Click the ReportHeader1 band header to show its options in the Properties window on the lower right.

- In the Properties window, locate and expand the Styles option. Click the Style dropdown and select ExecutiveSummaryHeader.

- Click the Detail11 pane to show its options in the Properties box on the lower right.
- In the Properties box, locate and expand the Styles option. Click the Style dropdown and select ExecutiveSummaryDetails.

- The process is complete. Remember to Save your changes before closing the Report Designer window.

The Result
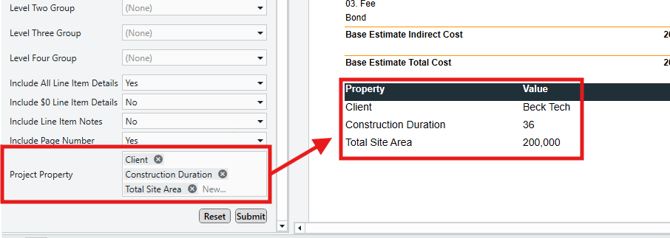
In the Configure a New Parameter section of this guide, we set three Default Values that correspond to the Project Properties we want to expose in the report; Client, Construction Duration, and Total Site Area:

You will see this new Project Property parameter in the report, where project properties can be added and removed dynamically:
Project Properties added into the this new parameter must be an exact match for the Project Property list found in your Estimate Project View.

Submit Your Suggestions to Help Improve This Article