This article will guide you through the process of inserting your company logo into a report template file. This is required when moving to a new standard report from Beck Tech, or when rebranding your company.
-
Open Report Designer.
- In Estimator, open an Estimate (any estimate, it doesn't matter which).
- Navigate to the Home View.
- In the main Ribbon, click on New Report...

- Report Designer will be launched.
- In Report Designer, open your report template file.
- Click the Open button.

- Navigate to the location of the report template file (.repx) that you want to export from and open it.
- Click the Open button.
-
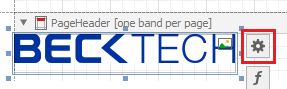
Click on the logo that you want to change.
-
On the right side of the selected image, click the gear icon.
-
Inside the resulting Picture Box Tasks popup, click on the ellipsis button inside the Image Source field.
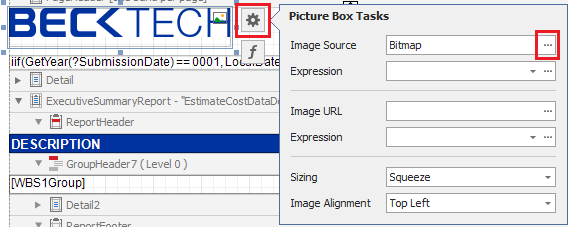
NOTE: You can embed the image directly into your report by using the Image Source field. However, if you prefer to save a path to the image instead, you can use the Image URL field.
-
Inside the Open window, navigate to your logo image file.
- Select the new logo file and click Open.
- Your new logo will be loaded.

-
Click the floppy disk icon to Save.

-
Run your report to test.
Optional: Resize Your Logo
-
If you'd like to make your logo larger:
-
Select the PageHeader band containing the logo and move the bottom edge downward to make space.
-
Move the ?SubmissionDate field down.
- Grab and expand the logo from the lower-right corner, ensuring there's no extra space around the logo image.
-
Reposition the ?SubmissionDate field up to the lower edge of the expanded logo.
- Drag the bottom edge of the PageHeader band back up (don't worry if you drag it upward too far - it will snap to the perfect size to fit all fields).
-

NOTE: If you set the Sizing property to Squeeze, resizing the Picture Box will not cause the logo to stretch.

Other Useful Links
Submit Your Suggestions to Help Improve This Article